|
Tip Of The Week
Getting Better Sunrise & Sunset Photos
As we have said earlier, November days become shorter and sunrise and sunset are at reasonable hours. In Offshoot we have some very fine landscape photographers but maybe some others may struggle a bit. If you are in that latter group then these tips are for you.
Sunrise and sunset photos capture both the natural beauty and vivid colours over a scene as the sun makes its first or final showing of the day. A sunrise or a sunset can be ‘just another photo’ and you only need to Google sunrise and sunset photography to find thousands of images. But if you seek something original and unique it's important to understand composition, the optimal camera settings, the planning, and editing techniques required.
For example, the dynamic range of sunrise and sunset scenes can be a challenge for the camera, but you can get a creative image with the right settings. Don’t forget that settings will vary depending on the conditions you're shooting in and the lens and camera combination you're using, however, some standard principles do apply.
Exposure
The first setting to consider is exposure. The exposure triangle—ISO, shutter speed, and aperture—must be balanced to prevent overexposed or underexposed photos. You don’t want blown-out highlights.
However, to be creative, underexposure or overexposure may be used to add drama or a gentler look and feel. For example, for brighter highlights (with the sun being the brightest highlight imaginable) underexposing will add more contrast and prominence to the shadows, creating a dramatic feel to the composition.
ISO
As the sun sinks below the horizon and the amount of light decreases, the ISO can be increased to compensate. Alternatively, a tripod keeps the ISO low, and the shutter speed can be slowed to allow more light into the sensor.
Aperture
A large aperture reduces the depth of field and makes the background softer (bokeh), while a smaller aperture brings sharp focus to the foreground and background. Generally, the aperture should be set somewhere between f/8 and f/16.
The aperture also plays a critical when you want a sunburst. Try an aperture of between f/13 - f/18. Sunbursts are most pronounced when the sun converges with a high-contrast edge, such as the horizon
Shutter Speed
Like the aperture, shutter speed determines the sharpness and exposure of the image.
A fast shutter speed minimizes exposure time and prevents blown-out images; too slow and the image may be blurry due to motion in the composition—such as moving clouds, swaying tree branches or the hand-held camera movement.
That is why shooting in RAW is important (RAW uses all of the sensor data).
White Balance
An accurate white balance can significantly enhance the realism of the image. You can also use various white balance settings to achieve different tonal and hue effects. Auto white balance may not always produce the bright, warm colours you get with sunset shots.
Shooting in RAW means you can adjust the white balance using the Kelvin (K) temperature in post processing.
To adjust the white balance using the Kelvin temperature, find your camera's White Balance setting and locate the Kelvin (K) temperature option. The scale for this setting ranges from 1000K to 10000K. It is best to begin at the neutral value of 5500K, approximating average sunlight, and adjust from there.

Auto Exposure Bracketing For HDR
Auto Exposure Bracketing is a useful technique. AEB involves taking multiple photos at different exposures, which can be combined to create an image with a higher dynamic range. By bracketing and tone mapping, you can ensure that all parts of the image are properly exposed, from the brightest parts of the sun to the darkest parts of the sky.
Composition : Add Interest and Depth
Composition is an essential element in capturing stunning sunrise/sunset photos. You can create visually stunning images by paying attention to how you arrange the elements in your frame. Here are some tips to help you:
1. Find a Unique Foreground Element
Including a foreground element in your sunset photo will add depth and interest to your image. Choose something that complements the sunset and doesn't compete with it for attention.
2. Experiment with Different Perspectives
Experiment with different perspectives e.g. shooting from a low angle can give a more dramatic look. a high angle can provide a unique perspective on the vastness of the sunset.
3. Use Leading Lines
Leading lines draw the viewer's eye into the photo. Look for natural lines in the environment, such as a path or a pier, and use them to lead the viewer toward the sun.
4. Apply the Rule of Thirds
Divide the frame into nine equal parts—with three horizontal and vertical lines spread equally apart—and place the photo's subject along the lines or at the points where the lines intersect.
5. Lenses and filters
A 12-18mm focal length lens gives the widest shot possible. Longer focal lengths isolate the sun around a specific part of the landscape. Telephoto lenses also increase lens compression, providing more relative distance and less distortion than wide-angle lenses.
The circular polarising filter (CPL) cuts glare and reflections from surfaces such as glass and water. The CPL filter can add rich contrast to skies and bring out warm colours from landscapes.
A neutral density (ND) filter can also be useful as it helps to reduce the amount of light entering the camera, preventing overexposure, which is a common issue when capturing sunrises/sunsets. A graduated neutral density filter is a type of ND filter useful for sunset photography because it blocks more light in the top part of the image, preventing the sky from becoming overexposed.
Using A Tripod
The camera can be handheld for short exposures with a fast shutter speed, as the risk of blurring is minimal. However, even the slightest camera movement can result in a blurry image for longer exposures with a slower shutter speed. To ensure sharp, clear images, it is essential to use a tripod.
Tripods come in various materials and sizes, and choosing one suitable for your camera and the type of photography you're doing is essential.
Planning Your Shoot
Timing is crucial when capturing the perfect sunrise/sunset photo. The best time to shoot is during the golden hour, the hour before sunset, and the hour after sunrise. During this time, the sun is lower in the sky, and its light is softer, creating a warm and natural look. The low position of the sun also casts longer, more pleasing shadows that provide a greater sense of depth.
Use tools like Photopills or the Photographer's Ephemeris to plan the sun's position during your shoot.
Arrive at the location at least 30 minutes before sunrise or sunset. That will give you enough time to set up, dial in your settings, and get your photos.
Have a clear idea of the type of the photograph you want to capture. Composition is essential. A beautiful sunset, for example, may be breathtaking, but the composition will make or break the final image. Utilize composition techniques such as the rule of thirds, contrast, and leading lines to create a more impactful image.
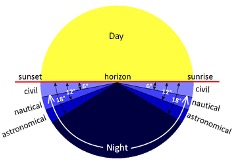
Finally, remember that there are many beautiful photos to take up to an hour before sunrise and after sunset. As the sun dips below the horizon, many soft tones and beautiful colours can still be seen during civil, nautical, and astronomical twilight.
Editing Your Sunrise/ Sunset Photos
Once you've captured the perfect photo, it's time to take it to the next level with some post-processing. Most photo editing apps can adjust the image's vibrance, exposure, colour profile, and colour grading. These small adjustments can make a big difference in the final image.
You can adjust the look of the sky without messing with the foreground and then make targeted foreground adjustments.
In conclusion, therefore, capturing the perfect sunrise/sunset photo requires technical understanding and creative expression.
Get creative and produce a sunrise or a sunset that’s not just ‘just another photo’. |